Seamonsters-2605.github.io
Writing your first program for the robot
Make sure you have followed all of the Setup Instructions to install Python 3, pyfrc, Visual Studio Code with Python support, Driver Station, and download the seamonsters library.
Open Visual Studio Code. Choose “Open folder”, and navigate to the folder called “SeamonstersTemplate” that you downloaded from GitHub. Open a terminal by selecting Terminal then New Terminal. Run the command:
git checkout practice-teleop
Create a new file and save it inside the folder with the name robot.py—it’s important that it has this exact name, with no capital letters.
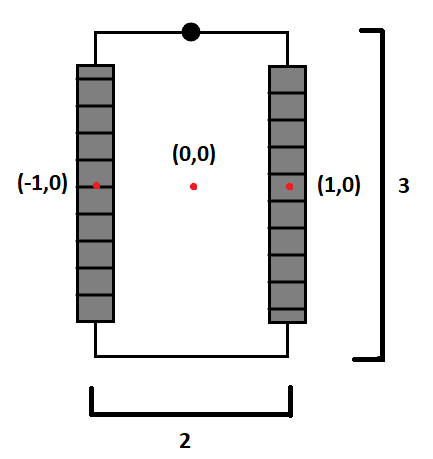
We will be writing a simple tank drive with two wheels, one on each side of the robot. Here is a visual if that helps, the numbers are in feet:
Follow along and write your own version of each of the lines of code. Please don’t copy and paste
import wpilib
import rev
import seamonsters as sea
import math
Each of these lines starts with the word import. This makes it so you can refrence a library in your code. A library is a collection of code that can be used in another file.
wpilib: for controling the robotrev: for sending commands to sparks that control motorsseamonsters: code that we have written over the years to improve on existing libraries and add helper functionsmath: python’s built in math library
The part in line three that says as sea means when refrencing the seamonsters library, all you need to do is write sea.
class PracticeBot(sea.SimulationRobot):
Here, we are creating a class which is a data type like an integer or string. Classes have their own functions and variables that are universal to all members of that class. Our class is named PracticeBot and it is using the class SimulationBot from the seamonsters library to build off of. SimulationBot should only be used when running the simulator, otherwise use GeneratorBot.
def robotInit(self):
This line defines the function robotInit with the argument of self. All robots need to have the robotInit function to work. It is the first thing that is called when the robot is created and it is where you put all of your variables like the sparks or joysticks. The word self in parenthesis refers to your PracticeBot class. All functions in a class need to have the self keyword in parentheisis. Notice this line is indented, this means that it is inside of the PracticeBot class.
self.joystick = wpilib.Joystick(0)
This line is indented one step farther, meaning that it is part of the robotInit function which is part of the PracticeBot class. Python uses colons and indentation to indicate the structure of code. First, we declare a variable named joystick. It has the word self in front of it that represents the PracticeBot class and then a period, followed by it’s name (joystick), meaning that it can be refrenced from any part in the class and outside of it. We set the joystick to a Joystick object from the wpilib library. (notice the difference in capitalization, classes always have the first letter capitalized while variables are camel cased) The 0 in parenthesis means that you are talking about the first joystick you have plugged in to the computer. If you wanted to have a second joystick, you would make another variable and set it to wpilib.Joystick(1).
self.initDrivetrain()
This line is at the same level of indentation as the line before, meaning that it is also part of the robotInit function. Here we are calling the initDrivetrain function that is part of the PracticeBot class which we will define next.
def initDrivetrain(self):
This is the start of the initDrivetrain function. Like robotInit, it has the word self in parenthesis which is how we were able to call it by saying self.initDrivetrain(). You need to include the parenthesis in a function call. Notice that this line has only one layer of indentation. This means that it is not part of the robotInit function but is part of PracticeBot.
        leftSpark = sea.createSpark(1, rev.MotorType.kBrushless)
        rightSpark = sea.createSpark(2, rev.MotorType.kBrushless)
Here we are defining two variables to represent the sparks that control the motors. The numbers 1 and 2 represent the first and second sparks connected to the robot. rev.MotorType.kBrushless is the type of motor we are using. The leftSpark and rightSpark variables are local and can only be refrenced inside of initDrivetrain because they do not have the word self in front.
        for spark in [leftSpark, rightSpark]:
            spark.restoreFactoryDefaults()
            spark.setIdleMode(rev.IdleMode.kBrake)
This uses a for loop to go through and call the restoreFactoryDefaults and setIdleMode functions on both of the sparks to reset them to their factory defaults for consistancy reasons and set them to brake mode when not moving.
        leftWheel = sea.AngledWheel(leftSpark, -1, 0, math.pi/2, 1, 16)
        rightWheel = sea.AngledWheel(rightSpark, 1, 0, math.pi/2, 1, 16)
Here we make two wheel objects from the seamonsters library. To create an AngledWheel you must give it the following perameters:
- A motor controller (the leftSpark or rightSpark)
- The x and y position of the wheel in feet. If you look at the example image of our robot, you can see that the middle of the left wheel is at (-1, 0) and the right one is at (1, 0)
- The direction the wheel is facing in radians. 0 is right and our wheels are facing forward so that is 90 degrees. 90 in radians is pi / 2.
- The encoder counts per foot. Our encoders have a value of 1.0 per rotation so we will just put it at 1 because we don’t have any specific wheel size.
- The velocity at 100% in voltage mode. Our motors are 16 feet per second.
        self.drivetrain = sea.SuperHolonomicDrive()
        self.drivetrain.addWheel(leftWheel)
        self.drivetrain.addWheel(rightWheel)
First we create a SuperHolonomicDrive object from the seamonsters library and name it drivetrain. The SuperHolomicDrive class is a universal drivetrain controller that works with all types of drivetrains. Since drivetrain has the word self in front of it, it can be refrenced outside of initDrivetrain. Then we add the left and right wheels to the drivetrain.
        for wheel in self.drivetrain.wheels:
            wheel.driveMode = rev.ControlType.kVelocity
These lines loop through the wheels in the drivetrain and set their mode to kVelocity mode so all the motors are consistent and the robot drives correctly.
sea.setSimulatedDrivetrain(self.drivetrain)
This allows the drivetrain to work in the robot simulator when you go to the debug tab in VSCode and run the simulation mode.
    def teleop(self):
        while True:
            #the next part goes here
            yield
These lines define the teleop function which is called once initally and then iterated 50 times per second. yield completes one iteration. If the while True was not there, everything would only run one time and not execute 50 times per second. Make sure yield is the last line in teleop, we will write the next few blocks of code in between while True and yield.
            mag = sea.deadZone(self.joystick.getY())
            mag *= 5
First we define the variable mag which we will use as the magnitude of speed to drive the robot. self.joystick.getY() returns a number between -1 and 1 for how far the joystick object we made earlier is being pushed on the y axis. The deadZone function, which is part of the seamonsters library, makes tiny values outputted by the joystick not affect robot movement. Then we multiply mag by 5 because that is the maximum feet per second that the robot can go.
            turn = sea.deadZone(self.joystick.getX())
            turn *= math.radians(300)
Here we make the variable turn which will be used to tell the robot how fast to turn. It is set to how far the joystick is being pushed on its x axis with the dead zone applied like what we did for mag. Then turn is multiplied by 300 in radians because that is the maximum radians per second that the robot can drive.
self.drivetrain.drive(mag, math.pi/2, turn)
Now we are ready to drive the robot. We get to call the drive function on the drivetrain which takes in the arguments magnitude, direction, and turn. We set the magnitude and turn to mag and turn that we just defined. Direction is set to pi / 2 which is forwards.
if __name__ == "__main__":
    wpilib.run(PracticeBot)
These lines are required at the bottom of a robot.py file and they allow you to deploy code to the robot, which we will do next. The first line checks if you are running the file directly, and the second line calls a function in the wpilib library to deploy the code.
import wpilib
import rev
import seamonsters as sea
import math

class PracticeBot(sea.SimulationRobot):

    def robotInit(self):
        self.joystick = wpilib.Joystick(0)

        self.initDrivetrain()

    def initDrivetrain(self):
        leftSpark = sea.createSpark(1, rev.MotorType.kBrushless)
        rightSpark = sea.createSpark(2, rev.MotorType.kBrushless)

        for spark in [leftSpark, rightSpark]:
            spark.restoreFactoryDefaults()
            spark.setIdleMode(rev.IdleMode.kBrake)

        leftWheel = sea.AngledWheel(leftSpark, -1, 0, math.pi/2, 1, 16)
        rightWheel = sea.AngledWheel(rightSpark, 1, 0, math.pi/2, 1, 16)

        self.drivetrain = sea.SuperHolonomicDrive()
        self.drivetrain.addWheel(leftWheel)
        self.drivetrain.addWheel(rightWheel)

        for wheel in self.drivetrain.wheels:
            wheel.driveMode = rev.ControlType.kVelocity

        sea.setSimulatedDrivetrain(self.drivetrain)

    def teleop(self):
        while True:
            mag = sea.deadZone(self.joystick.getY())
            mag *= 5
            turn = sea.deadZone(self.joystick.getX())
            turn *= math.radians(300)

            self.drivetrain.drive(mag, math.pi/2, turn)

            yield

if __name__ == "__main__":
    wpilib.run(PracticeBot)
This is what the code should look like
Deploy the robot code
(if somebody else is using the robot, you may want to try the robot simulator which lets you test your code without a robot.)
To get your code onto the robot you must “deploy” it over WiFi. First check that the robot is on and nobody else is using it (only one person can be connected at a time). When the robot is ready there will be a WiFi network called “2605” (it can take a while to appear). Connect to this network. Don’t wait for the connection to finish.
Driver Station
Open Driver Station. If you don’t have Driver Station, skip this step.
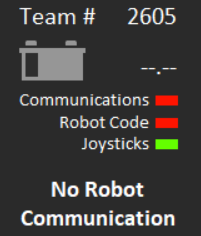
Look for this panel in Driver Station. Check for these things:
- The Team # should be 2605. If it isn’t, click the Gear tab on the left and change the team number.
- The Communications light should be green, to show that you are connected to the robot over WiFi. It could take a while. If it doesn’t connect, there’s a problem—see the section below.
- There was probably already robot code on the robot, so the Robot Code light will be green. Once you deploy code, it stays on the robot until it’s replaced. Your own code isn’t on the robot yet.
- The Joysticks light will turn green once you plug in the two joysticks.
To the right of this panel there is a small gear icon. Click this and choose View Console. Resize the window so it is fully visible while you are deploying code. This is where error messages will appear if something is wrong or if you made a mistake (you will make lots of mistakes while programming).
Deploy
In Visual Studio Code, choose View > Integrated Terminal. In the terminal window, type: python robot.py deploy --builtin. If that doesn’t work replace python with py. The first time you deploy it will ask for the robot hostname. Type: roborio-2605-frc.local. If it asks you to “store key in cache,” choose Yes.
Watch the Driver Station message console window for any error messages. Once the code has finished deploying successfully, the Robot Code light in Driver Station will turn red as the code starts, then green again.
You are now ready to enable the robot. Let everybody in the room know you are about to enable, just in case something goes wrong. Be ready to press Enter at any time to stop the robot. Make sure to keep watching the Message Console window—if something isn’t working correctly, there’s probably an error message to tell you what’s wrong. Often this error is a Stack Trace.
With the robot enabled, you can use the joysticks to drive the robot. One controls the left motors and one controls the right—push them forward and backward to drive. This type of control is called Tank Drive.
If Driver Station can’t connect…
If the “Communications” light on Driver Station doesn’t turn green when you connect to the robot WiFi:
- Make sure the team number is set to 2605. Click the Gear tab on the left side of the window and check.
- Try disconnecting and reconnecting. You usually have to do this the first time you connect after turning on the robot.
- Click the Gear tab on the left side of the window, and try changing the team number to “10.26.5.2”. If this works for you, you’ll probably have to do that every time you start Driver Station. This is a problem that seems to affect certain laptops in combination with the new WiFi routers.
Next Steps
Now that you’ve gotten your first robot program running on the robot (or in the simulator), it’s time to improve it. Move on to the More Teleop Programming Practice page.